Last year I got my craft mojo on and decided to make little Valentine cards for my kids to send to their friends. I wanted to post the photos last year, but I didn't want to reveal the surprise before they received the cards in the mail. So, here are the pictures now...perhaps they will inspire someone to make homemade cards this February. I used little treat cups from Stampin' Up! The pink tag at the top pulls out so the M&Ms can be released through a little circle inside the card. Some clever person came up with the idea, not me. You can finds TONS of card making inspiration and clever ideas like this one on http://www.splitcoaststampers.com/gallery/ That's my go to source for card ideas, but Pinterest is great too. Happy crafting!
A place to share my thoughts and ideas about parenting, homeschooling, crafting, baking and more...
Showing posts with label homemade gifts. Show all posts
Monday, January 14, 2013
Monday, February 13, 2012
S'more Valentine Idea
Need a last minute Valentine idea? My friend, Amy, made all the ladies in our Craft & Chat group the cutest little Valentine treats. She got the idea and a free printable download (Check it out!) from The Domesticated Lady blog. Thank you, Amy for the adorable idea and for the tasty stress reliever. Ah chocolate, always a balm for weary mommies. :)
![]() |
| Picture "borrowed" from The Domesticated Lady. |
Friday, January 20, 2012
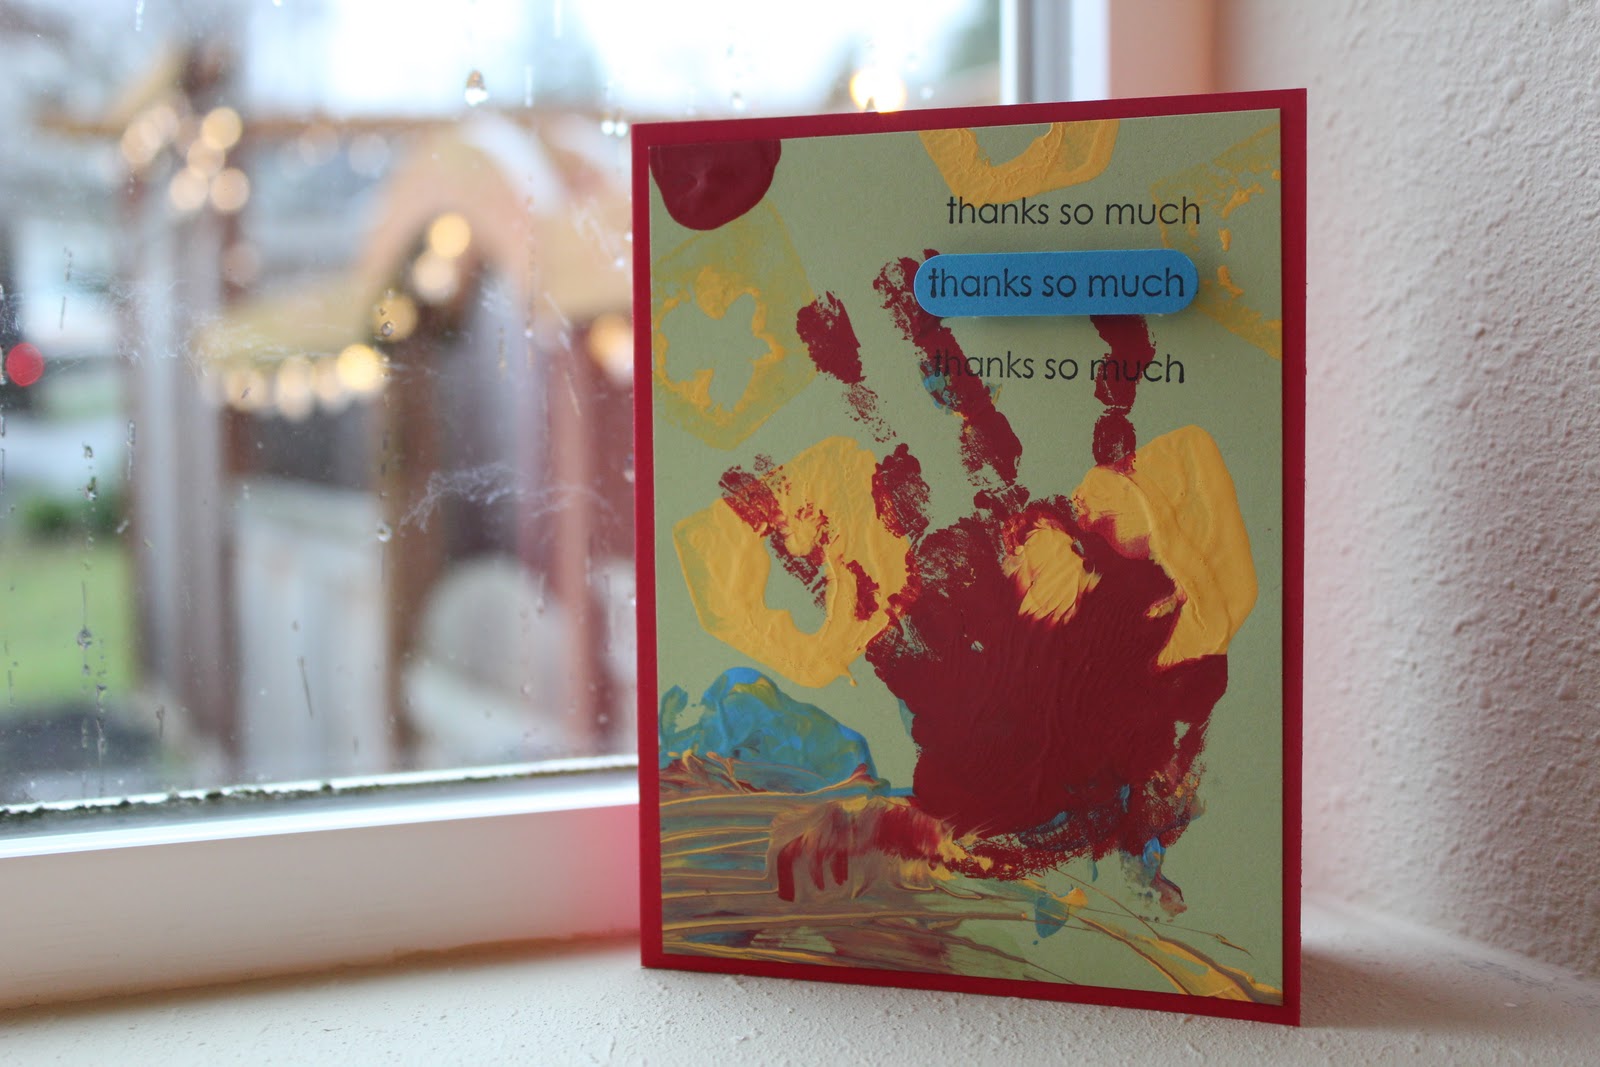
Handmade Thank You Cards
Back in November, I posted about painting with veggies. We started out using celery, apples, and carrots to put paint to paper, but we ended up finger painting and making painted handprints too. Messy fun! Anyway, I tucked away the kids' painted 12x12 papers with thoughts of somehow turning their artwork into a keepsake. Then December rolled in and we got swept up in advent calendar activities and prepping for Christmas company. Once life settled down at the end of December, I thought about making thank you cards with the kids so they could thank family and friends for their Christmas gifts. That's when I remembered the veggie paintings, and an idea for a quick card making craft was born.
I trimmed the 12x12 pages into 4"x 5 1/4" rectangles. Then I adhered the painted rectangles with double stick 3-D foam to 4 1/4 x 5 1/2" cards. To finish the look, I stamped "thanks so much" in black ink. To give added dimension, I also stamped "thanks so much" to a coordinating colored cardstock and punched it out. I adhered the punched out phrase with more 3-D foam, and stood back to admire the finished product. In a short time, I had 12 handmade cards- each one unique.
When it was time to actually write out the thank you's, I interviewed my son about his gifts and wrote his own words in each card. Some of his descriptions were hilarious! (Lil sis is too small for much commentary yet.) I enjoyed getting feedback from the recipients of the hand painted cards. My sister was inspired by our little project and sent us a thank you card with my niece's handprint on it. I'm definitely keeping that card!
Thursday, December 15, 2011
Salt Dough Ornaments *Updated*
One of our advent activities was to make Christmas ornaments, but I didn't have a clue what to make them out of. My friend, Amy, suggested salt dough ornaments- thank you for the idea, Amy!! The kids had fun and we made a variety of gifts from this project. Sorry I can't share pictures of the finished products as the ornaments are going to be given to people who sometimes read this blog. **Update** Now that Christmas is over, I've posted a photo of our finished ornament at the bottom of the screen, so scroll down to see it. :)
On the first day, we made the dough and cut out our shapes. The kids had a blast working with the dough and making a mess. While they played, I cut out the real ornaments that we'd give as gifts. I used cookie cutters to make the shapes. Some of the cut out shapes I also stamped with a rubber stamp to give the dough an interesting pattern. I baked our creations and let the kids play with the excess dough.
On the second day, we painted the baked ornaments. The kids love to paint and did a great job. (Although, Miss M decided to paint her tongue yellow while my back was turned! Ugh!! Well, now she knows that paint doesn't taste good.) Once the paint dried, I added some embellishments to the ornaments. I discovered that a coat of Mod Podge is a good way to give our little creations a top coat. While the Mod Podge was still wet, I sprinkled clear glitter on some of the ornaments. They turned out quite nice. Once everything was dry, I added ribbon as a finishing touch. (If you visit Pintrest, just type in a search for salt dough ornaments and you'll find a wonderful variety of ideas to get your creative juices flowing.)
Recipe for Salt Dough Ornaments
(Makes about 12 small handprint ornaments)
Ingredients:
4 cups flour
1 cup salt
1 1/2 cups water
Note: Add more water if needed.
Ingredients:
4 cups flour
1 cup salt
1 1/2 cups water
Note: Add more water if needed.
Directions:
Combine ingredients and knead dough for 15 to 20 minutes.
Bake at 300ºF about 20 to 25 minutes or until golden.
You may have to bake considerably longer depending on how thick your items are.
They may not feel hard right away but will harden as they cool.
(Ours never did harden even after baking for 40 minutes...guess I added too much water.)
Friday, December 10, 2010
Day 8, Homemade Note Pads
Ana's recent comments on Day 6 have inspired me to share a homemade gift idea. You can make adorable note pads from jr. legal pads that have been cut in half. Go to Staples or Office Depot and purchase the pads there (rather than cheap ones from elsewhere- they fall apart). At the office supply store's copy center they will cut them in half (vertically) for you. They may charge you a couple of dollars per cut, so have them put as many notepads as possible in the machine at once. Then, just pick out some cute paper or cardstock to decorate them. I also stamped an image and adhered it with 3-d adhesive foam to the top. If you've got time on your hands, you can stamp the bottom of each page. I've made bunches of these in the past as stocking stuffers. Usually, I tie a ribbon around the middle and tuck in a nice pen to make it more of a gift set. Sometimes I put magnets on the back so it can be used on the fridge. Here are some photos of the finished product that I made last year.
Saturday, December 4, 2010
Day 4, Handmade Christmas Ornament
Welcome to day 4 of the 12 blogs of Christmas! One of our Christmas traditions is to get a new ornament for the tree every year. Often we'll buy an ornament when we are on vacation. I love to decorate the tree each December and recall the memories the each ornament represents.
Last year, we adopted our son from Rwanda. What an amazing journey that was! I do have a small basket from Rwanda that we hang on the tree to commemorate our trip to get him, and to celebrate his birth country. However, I wanted an ornament that shows how Africa has been woven into the fabric of our family. Out of the blue, I got inspiration to make my own ornament in the shape of Africa with the use of a cookie cutter. (I found the cookie cutter on Copper Gifts.com) I used two colors of Sculpey clay to show how even though we have different skin colors, we're still one family. Rwanda has three official languages, one of which is French; so I used a rubber stamp (from Stampin Up!) with French script on it to add visual interest and texture to the ornament. Finally, I placed a brad in the shape of a heart to represent Rwanda. (I baked the ornament according to Sculpey clay's directions.) The finished product exceeded my expectations. I've made four more since then as gifts, but this first one is my favorite. Each one looks different since the clay molds together in unique shapes.
You can use polymer clay to make all kinds of ornaments. This would be a fun activity to do with grade school kids. You only need a few items to make them: clay, cookie cutters, a rolling pin, a straw to make the hole at the top, ribbon, and some embellishments. Give it a try!
Last year, we adopted our son from Rwanda. What an amazing journey that was! I do have a small basket from Rwanda that we hang on the tree to commemorate our trip to get him, and to celebrate his birth country. However, I wanted an ornament that shows how Africa has been woven into the fabric of our family. Out of the blue, I got inspiration to make my own ornament in the shape of Africa with the use of a cookie cutter. (I found the cookie cutter on Copper Gifts.com) I used two colors of Sculpey clay to show how even though we have different skin colors, we're still one family. Rwanda has three official languages, one of which is French; so I used a rubber stamp (from Stampin Up!) with French script on it to add visual interest and texture to the ornament. Finally, I placed a brad in the shape of a heart to represent Rwanda. (I baked the ornament according to Sculpey clay's directions.) The finished product exceeded my expectations. I've made four more since then as gifts, but this first one is my favorite. Each one looks different since the clay molds together in unique shapes.
| My original idea of an ornament that represents our family. |
Friday, December 3, 2010
Day 3, Treat Gift Bags
Wow, I'm scrambling to get ready to go to China! We're going to be there for Christmas!! So today's post is going to be short...
This is for those of you who like to make homemade gifts. Listed below is a great video tutorial from Dawn's Stamping Thoughts on how to make adorable little treat bags (3" by 5" when complete). I made seven of them in an afternoon. It took me three tries to get it right, but they were easy after that. I filled my little bags with delicious Dillettante chocolate mints from Costco ($9.99). Each bag will hold approximately ten chocolates. I'm planning to give them to the nursery workers at church, and to my co-workers. Of course, I'm sampling the chocolate liberally! I love chocolate mint!!
Here's the link: http://dawnsstampingthoughts.typepad.com/dawns_stampin_studio/2010/10/cute-simple-box-video-.html
This is for those of you who like to make homemade gifts. Listed below is a great video tutorial from Dawn's Stamping Thoughts on how to make adorable little treat bags (3" by 5" when complete). I made seven of them in an afternoon. It took me three tries to get it right, but they were easy after that. I filled my little bags with delicious Dillettante chocolate mints from Costco ($9.99). Each bag will hold approximately ten chocolates. I'm planning to give them to the nursery workers at church, and to my co-workers. Of course, I'm sampling the chocolate liberally! I love chocolate mint!!
Here's the link: http://dawnsstampingthoughts.typepad.com/dawns_stampin_studio/2010/10/cute-simple-box-video-.html
See you tomorrow for day 4 of my 12 blogs of Christmas!
Friday, November 5, 2010
A Sweet Thank You
| My husband made some awesome cookies last night! I'll share the recipe soon. |
| I wanted to give some of the cookies to our neighbors as a thank you for taking family photos for us yesterday. |
Supplies for thank you gift bag: paper lunch bag, clear bag for cookies, cranberry card stock (3" x 11"), decorative card stock (2 1/2" x 11"), ribbon, adhesive (I love Staples' permanent glue tape), thank you stamp, stamp pads, and 3-D foam tape. I stamped the sentiment, cut it out with a Creative Memories' oval template, and sponged the edges of the oval with brown ink by Color Box.
| The finished product before I tucked it into the gift bag: cookies and a gift card for coffee. I also included the recipe for the cookies in case anyone has food allergies. |
The idea for this gift bag came from a Martha Stewart magazine. It was simple to make, and nice to use items I already had at home. When my husband arrived home with the gift card, I was delighted that it matched my color scheme. He sarcastically claimed that he did that on purpose. Men just don't get it, do they?
Subscribe to:
Posts (Atom)