Last year I got my craft mojo on and decided to make little Valentine cards for my kids to send to their friends. I wanted to post the photos last year, but I didn't want to reveal the surprise before they received the cards in the mail. So, here are the pictures now...perhaps they will inspire someone to make homemade cards this February. I used little treat cups from Stampin' Up! The pink tag at the top pulls out so the M&Ms can be released through a little circle inside the card. Some clever person came up with the idea, not me. You can finds TONS of card making inspiration and clever ideas like this one on http://www.splitcoaststampers.com/gallery/ That's my go to source for card ideas, but Pinterest is great too. Happy crafting!
A place to share my thoughts and ideas about parenting, homeschooling, crafting, baking and more...
Showing posts with label crafts. Show all posts
Monday, January 14, 2013
Tuesday, October 30, 2012
Thanksgiving Tree
Long time since I've posted here...sorry! Things are going well, but it's busy home schooling the kids and keeping up with the daily stuff as well. I thought I'd share our latest project in case someone else might be inspired by it. I wanted to do some sort of art project for Thanksgiving with the kids that would focus on the reason for the holiday: gratitude. So, I pondered for a while and came up with the idea of a Thanksgiving Tree. It was easy and fun to do. We had a great time and actually didn't get extremely messy, which was good since we were not in paint clothes! While the kids were "napping" in their rooms, I painted trees onto the back side of wrapping paper. I used FolkArt paint from Wal-mart. It dries fast and washes off easily, plus it's only .97 cents per bottle. Once the trees were dry, I painted the kids' hands to make the leaves. We put twenty two "leaves" on each tree since Thanksgiving is on the 22nd this year. Each day, starting November 1st, we'll write one thing that they are thankful for on a leaf. Then, on Thanksgiving day, the kids will have a tree full of blessings that we can talk about while we enjoy our turkey dinner. Here are some pictures in case you want to make your own.
I painted the trees onto the back side of wrapping paper. Older kids could paint their own tree. If you want to make it into an art lesson, have them observe trees outside to see how the limbs look without the leaves.
Next I added a bit of grass at the base of the tree so it didn't look like it was floating on the page. I also added a title so we'd know whose tree belong to whom. Before we started painting our leaves, I asked the kids to look outside at the variety of leaves on the trees in our backyard. We named the different colors we saw so the kids would know why we were using the variety of colors I chose for this project.
Time to get messy! I folded the paper so the kids could reach the limbs of the trees without ripping up the paper by crawling on it. I opted to do one kid at a time, and just one hand painted at a time. Marisa wanted to try painting her own hand. I let her for a couple of leaves. She did amazingly well for not even three years old! (We did eleven leaves with the left hand then washed and took a break so those could dry.)
While Marisa's eleven leaves were drying, Kieran had a turn to do some leaves on his tree. I did most of the painting on his hand, but let him try a couple on his own. He was a bit more enthusiastic with the paint, but only got a bit on his jeans. It washed out no problem. Once his eleven leaves were done, then sister had a turn again to do the rest with her right hand. The key for these guys was to do one kid at a time, and only one hand at a time...making sure to escort them to the sink so we didn't paint the whole kitchen. :)
Here's Marisa with her finished project. (She loves her "Penny the Penguin" from Koala Brothers.)
Here's Kieran with his Thanksgiving Tree. (Love that smile!)
Both trees are on the wall in the dining room where we do our home school lessons. We'll write one thing that we are thankful for on a leaf each day in November till Thanksgiving. Then while we eat our meal, we can review all the amazing things God has blessed us with this year.
With a bit of trepidation, I let Marisa (the two year old!) hold my giant camera. She actually got a decent photo of Kieran and me. Everybody was all smiles after having a good time painting. There were tense moments, but overall it was just fun. I'm eager for November to arrive so we can start writing on our leaves.
Parenting is hard work, and not every day is all smiles and silliness like we had this afternoon. However, it's the moments like these that I blog about so I can remember and know that there are a lot of good times mixed in with the tough ones. Perhaps my blogs are a kind of Thanksgiving tree for me. How do you help your kids (and yourself) develop grateful hearts? I'd love to hear from you.
Monday, February 13, 2012
S'more Valentine Idea
Need a last minute Valentine idea? My friend, Amy, made all the ladies in our Craft & Chat group the cutest little Valentine treats. She got the idea and a free printable download (Check it out!) from The Domesticated Lady blog. Thank you, Amy for the adorable idea and for the tasty stress reliever. Ah chocolate, always a balm for weary mommies. :)
![]() |
| Picture "borrowed" from The Domesticated Lady. |
Friday, January 20, 2012
Handmade Thank You Cards
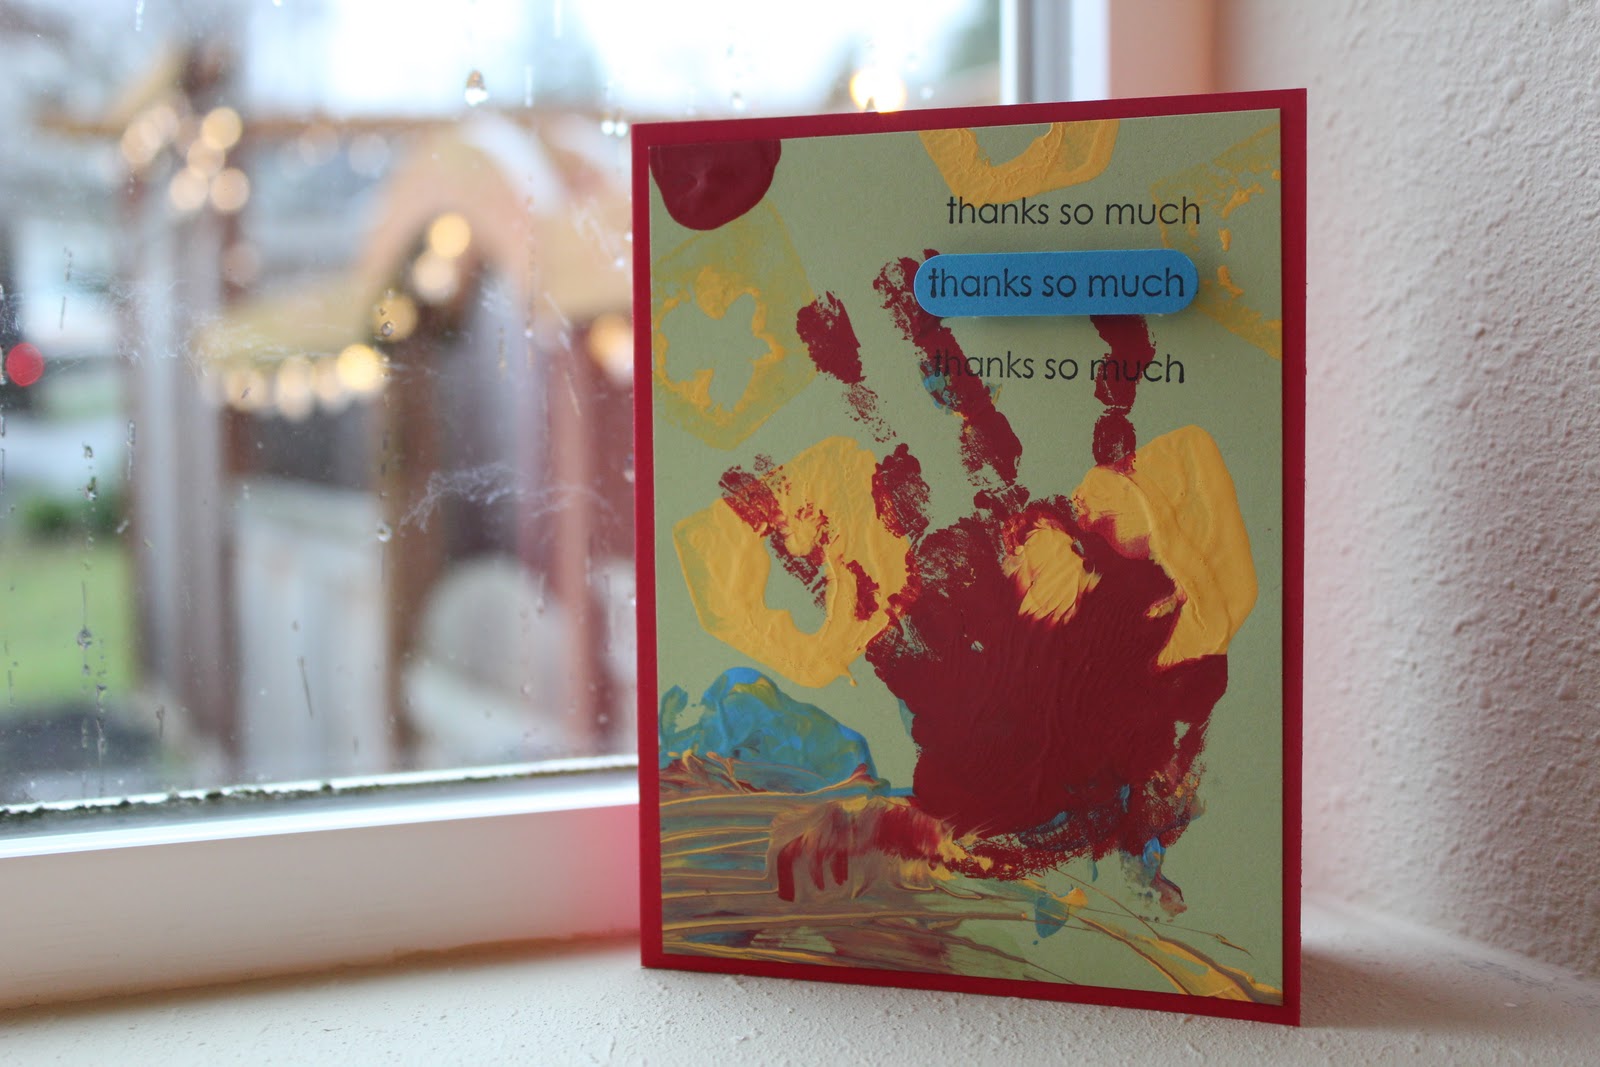
Back in November, I posted about painting with veggies. We started out using celery, apples, and carrots to put paint to paper, but we ended up finger painting and making painted handprints too. Messy fun! Anyway, I tucked away the kids' painted 12x12 papers with thoughts of somehow turning their artwork into a keepsake. Then December rolled in and we got swept up in advent calendar activities and prepping for Christmas company. Once life settled down at the end of December, I thought about making thank you cards with the kids so they could thank family and friends for their Christmas gifts. That's when I remembered the veggie paintings, and an idea for a quick card making craft was born.
I trimmed the 12x12 pages into 4"x 5 1/4" rectangles. Then I adhered the painted rectangles with double stick 3-D foam to 4 1/4 x 5 1/2" cards. To finish the look, I stamped "thanks so much" in black ink. To give added dimension, I also stamped "thanks so much" to a coordinating colored cardstock and punched it out. I adhered the punched out phrase with more 3-D foam, and stood back to admire the finished product. In a short time, I had 12 handmade cards- each one unique.
When it was time to actually write out the thank you's, I interviewed my son about his gifts and wrote his own words in each card. Some of his descriptions were hilarious! (Lil sis is too small for much commentary yet.) I enjoyed getting feedback from the recipients of the hand painted cards. My sister was inspired by our little project and sent us a thank you card with my niece's handprint on it. I'm definitely keeping that card!
Thursday, December 15, 2011
Salt Dough Ornaments *Updated*
One of our advent activities was to make Christmas ornaments, but I didn't have a clue what to make them out of. My friend, Amy, suggested salt dough ornaments- thank you for the idea, Amy!! The kids had fun and we made a variety of gifts from this project. Sorry I can't share pictures of the finished products as the ornaments are going to be given to people who sometimes read this blog. **Update** Now that Christmas is over, I've posted a photo of our finished ornament at the bottom of the screen, so scroll down to see it. :)
On the first day, we made the dough and cut out our shapes. The kids had a blast working with the dough and making a mess. While they played, I cut out the real ornaments that we'd give as gifts. I used cookie cutters to make the shapes. Some of the cut out shapes I also stamped with a rubber stamp to give the dough an interesting pattern. I baked our creations and let the kids play with the excess dough.
On the second day, we painted the baked ornaments. The kids love to paint and did a great job. (Although, Miss M decided to paint her tongue yellow while my back was turned! Ugh!! Well, now she knows that paint doesn't taste good.) Once the paint dried, I added some embellishments to the ornaments. I discovered that a coat of Mod Podge is a good way to give our little creations a top coat. While the Mod Podge was still wet, I sprinkled clear glitter on some of the ornaments. They turned out quite nice. Once everything was dry, I added ribbon as a finishing touch. (If you visit Pintrest, just type in a search for salt dough ornaments and you'll find a wonderful variety of ideas to get your creative juices flowing.)
Recipe for Salt Dough Ornaments
(Makes about 12 small handprint ornaments)
Ingredients:
4 cups flour
1 cup salt
1 1/2 cups water
Note: Add more water if needed.
Ingredients:
4 cups flour
1 cup salt
1 1/2 cups water
Note: Add more water if needed.
Directions:
Combine ingredients and knead dough for 15 to 20 minutes.
Bake at 300ºF about 20 to 25 minutes or until golden.
You may have to bake considerably longer depending on how thick your items are.
They may not feel hard right away but will harden as they cool.
(Ours never did harden even after baking for 40 minutes...guess I added too much water.)
Wednesday, November 30, 2011
Advent Calendar
Last year, I posted about a cute advent calendar using a mini muffin tin. I was packing my bags to head to China to meet our daughter, so the whole idea of making anything crafty was just not going to happen. However, this year I was blessed to be a part of a ladies' Bible study/ craft group. Guess what we made?? Yep, the muffin tin advent calendar. I just -totally procrastinated!- filled each little cup with a slip of paper naming a Christmas activity for the day. So tomorrow we'll get to remove #24 as we count down to Christmas and Jesus's birthday. If you want to do a last minute calendar, even using 24 envelopes would work, here are some activities you could include in your count down, I listed more than 24 so pick what you like or make up your own... Sorry I didn't post this sooner!
![]() |
| Our very own advent calendar; my kids are so excited. Everything is attached by magnets. |
Read a Christmas story.
Memorize a Christmas verse.
Name 3 things you are grateful for.
Sing a favorite Christmas song.
Call your grandparents and tell them you love them.
Make a surprise for Daddy.
Have hot cocoa as a family.
Make a Christmas card and send it to your grandparents
Watch a Christmas movie.
Color a picture of the nativity. (Look on-line for free color sheets to print out.)
Go on a drive to see Christmas lights.
Make a special Christmas treat. (I have a super easy recipe for peanut clusters on my blog!)
Deliver treats to neighbors.
Act out the nativity story and read Luke 2:1-20.
Make a gift for Grandma and Grandpa & wrap it.
Shop for a gift for a cousin, friend, or family member & wrap it.
Give a gift to a child in need.
Look at the stars if the sky is clear.
Play a game as a family: hide & seek…
Finger painting (which could potentially be a gift if framed.)
Build a snowman or make a snack for the birds to eat.
Go on a nature hike
Wrap a gift for Daddy
Memorize a Christmas song to sing for our family on Christmas day.
Help clean the house for company (my kids actually think it's fun to help clean!)
Open one gift on Christmas Eve
Remember that the greatest gift ever given was Jesus. God loves you very much! (John 3:16)
Thursday, October 27, 2011
A Little "Fall" Project
I joined a ladies' small group at my church that meets once a week for a bit of parenting advice, Bible study, encouragement, and time to chat with other moms while we work on a craft or project. I love being a part of this group! Every week I come home with fresh ideas to help me in my parenting role, and I've had a chance to be creative or at least productive. The crafts are prepared for us ahead of time so we just show up and get to do the fun part of making the project- perfect for tired moms who want some down time. Recently, we made a set of blocks that say "Fall". It was not hard to do, but the end result was so cute. The clever part was using die cut letters; they look so much better than if we'd tried to paint them. We adhered the letters with Mod Podge which is a kind of glue that you brush over the entire block. It dries clear with a bit of a shine.
| The blocks are four and five inches tall. We roughed them up with sand paper after we finished painting them, but before we adhered the letters. |
| Baby M was hanging out with me while I took pictures of my fall project. |
![]() |
| Now she's trying to run off with my blocks so I switch my focus and photograph her instead. What a cutie!! |
Friday, October 14, 2011
Craft Idea: Thank You Cards for Brides
![]() |
| I made thirty of these cards for my sister to use as wedding shower thank yous. |
Friday, September 23, 2011
Wedding Shower Gift Boxes
The wedding shower went well. (Thank you to the ladies that gave me game ideas!) We ended up keeping it simple. I did a quiz to see how well they knew my sister. Several people got all ten right. I asked her to leave for a moment and the gals were asked to write down as many things as they could remember about what she was wearing. We also gave a prize to the person whose birthday or anniversary was closest to my sister's wedding date, ended up the mother of the bride had the closest anniversary, and the mother of the groom had the closest birthday. Then during gift opening, we set the timer for random amounts of time. Whenever it went off, the person whose gift was being unwrapped received a prize. I think everybody had a great time.
I also made little treat boxes and filled them with bags of chocolate covered almonds as a party gift for everyone that attended the wedding shower. I've attached a couple of pictures below so you can see the finished product. Also, I've included a brief "tutorial" if you'd like to make these treat boxes. (If you need more info, I can email you a pdf file that gives step by step instructions.) They are very easy to make and you can get two boxes from one sheet of 8 1/2 x 11" card stock. Supplies needed to make the box: card stock, double stick tape, scissors, Scor-pal (or some sort of system to make score lines), and whatever embellishments you want.
![]() |
| Here's the completed treat box. It was a bit beat up by the time I remembered to photograph it. The box is about 3 1/2" by 3" by 1 1/4". |
![]() |
| I made fifty of these little boxes. Crazy, I know, but it was fun too. |
Friday, December 10, 2010
Day 8, Homemade Note Pads
Ana's recent comments on Day 6 have inspired me to share a homemade gift idea. You can make adorable note pads from jr. legal pads that have been cut in half. Go to Staples or Office Depot and purchase the pads there (rather than cheap ones from elsewhere- they fall apart). At the office supply store's copy center they will cut them in half (vertically) for you. They may charge you a couple of dollars per cut, so have them put as many notepads as possible in the machine at once. Then, just pick out some cute paper or cardstock to decorate them. I also stamped an image and adhered it with 3-d adhesive foam to the top. If you've got time on your hands, you can stamp the bottom of each page. I've made bunches of these in the past as stocking stuffers. Usually, I tie a ribbon around the middle and tuck in a nice pen to make it more of a gift set. Sometimes I put magnets on the back so it can be used on the fridge. Here are some photos of the finished product that I made last year.
Saturday, December 4, 2010
Day 4, Handmade Christmas Ornament
Welcome to day 4 of the 12 blogs of Christmas! One of our Christmas traditions is to get a new ornament for the tree every year. Often we'll buy an ornament when we are on vacation. I love to decorate the tree each December and recall the memories the each ornament represents.
Last year, we adopted our son from Rwanda. What an amazing journey that was! I do have a small basket from Rwanda that we hang on the tree to commemorate our trip to get him, and to celebrate his birth country. However, I wanted an ornament that shows how Africa has been woven into the fabric of our family. Out of the blue, I got inspiration to make my own ornament in the shape of Africa with the use of a cookie cutter. (I found the cookie cutter on Copper Gifts.com) I used two colors of Sculpey clay to show how even though we have different skin colors, we're still one family. Rwanda has three official languages, one of which is French; so I used a rubber stamp (from Stampin Up!) with French script on it to add visual interest and texture to the ornament. Finally, I placed a brad in the shape of a heart to represent Rwanda. (I baked the ornament according to Sculpey clay's directions.) The finished product exceeded my expectations. I've made four more since then as gifts, but this first one is my favorite. Each one looks different since the clay molds together in unique shapes.
You can use polymer clay to make all kinds of ornaments. This would be a fun activity to do with grade school kids. You only need a few items to make them: clay, cookie cutters, a rolling pin, a straw to make the hole at the top, ribbon, and some embellishments. Give it a try!
Last year, we adopted our son from Rwanda. What an amazing journey that was! I do have a small basket from Rwanda that we hang on the tree to commemorate our trip to get him, and to celebrate his birth country. However, I wanted an ornament that shows how Africa has been woven into the fabric of our family. Out of the blue, I got inspiration to make my own ornament in the shape of Africa with the use of a cookie cutter. (I found the cookie cutter on Copper Gifts.com) I used two colors of Sculpey clay to show how even though we have different skin colors, we're still one family. Rwanda has three official languages, one of which is French; so I used a rubber stamp (from Stampin Up!) with French script on it to add visual interest and texture to the ornament. Finally, I placed a brad in the shape of a heart to represent Rwanda. (I baked the ornament according to Sculpey clay's directions.) The finished product exceeded my expectations. I've made four more since then as gifts, but this first one is my favorite. Each one looks different since the clay molds together in unique shapes.
| My original idea of an ornament that represents our family. |
Friday, December 3, 2010
Day 3, Treat Gift Bags
Wow, I'm scrambling to get ready to go to China! We're going to be there for Christmas!! So today's post is going to be short...
This is for those of you who like to make homemade gifts. Listed below is a great video tutorial from Dawn's Stamping Thoughts on how to make adorable little treat bags (3" by 5" when complete). I made seven of them in an afternoon. It took me three tries to get it right, but they were easy after that. I filled my little bags with delicious Dillettante chocolate mints from Costco ($9.99). Each bag will hold approximately ten chocolates. I'm planning to give them to the nursery workers at church, and to my co-workers. Of course, I'm sampling the chocolate liberally! I love chocolate mint!!
Here's the link: http://dawnsstampingthoughts.typepad.com/dawns_stampin_studio/2010/10/cute-simple-box-video-.html
This is for those of you who like to make homemade gifts. Listed below is a great video tutorial from Dawn's Stamping Thoughts on how to make adorable little treat bags (3" by 5" when complete). I made seven of them in an afternoon. It took me three tries to get it right, but they were easy after that. I filled my little bags with delicious Dillettante chocolate mints from Costco ($9.99). Each bag will hold approximately ten chocolates. I'm planning to give them to the nursery workers at church, and to my co-workers. Of course, I'm sampling the chocolate liberally! I love chocolate mint!!
Here's the link: http://dawnsstampingthoughts.typepad.com/dawns_stampin_studio/2010/10/cute-simple-box-video-.html
See you tomorrow for day 4 of my 12 blogs of Christmas!
Wednesday, December 1, 2010
Day 1, Advent Calendar
Happy December 1st! I've decided to post something Christmas related for the first twelve days of December. Glad you could join me for day one.
When I was little, we always had some sort of advent calendar to help us count the days till Christmas. My mom made a candy count down for us one year. She used a long strip of green felt, attached 24 strips of red ribbon, and tied a peppermint to each ribbon. That was a fun way to count down to Christmas. We also had a 3-D cardboard manger display that had a little window to open each day. I think there was a Christmas story or part of a verse to read behind the window. For whatever reason, I always got a kick out of the daily activity of opening a new window or removing a candy. I wanted to pass on the tradition to our son.
To keep things simple, I decided to use an old classroom calendar to help K see the progression of days till Christmas. The teacher in me can't pass up the opportunity to teach him about the days of the week, the concept of months, and counting! Each morning we're adding the date to the calendar and then counting how many days left until Christmas. Nothing fancy, but I love that he's learning and there's no candy involved! Also, this will help him understand the passage of time when we are away in China.
I did see a cool and crafty idea for an advent calendar using a mini muffin pan. Perhaps next year when K is older and I'm not preparing for an international trip we'll try it. If you are feeling creative, or want a new way to help your kids count the days till Christmas, I've found a great blog tutorial to help get you started with the mini muffin tin idea. You can get step by step directions here: http://sumossweetstuff.blogspot.com/2009/11/tutorial-tuesday-advent-calendar.html
When I was little, we always had some sort of advent calendar to help us count the days till Christmas. My mom made a candy count down for us one year. She used a long strip of green felt, attached 24 strips of red ribbon, and tied a peppermint to each ribbon. That was a fun way to count down to Christmas. We also had a 3-D cardboard manger display that had a little window to open each day. I think there was a Christmas story or part of a verse to read behind the window. For whatever reason, I always got a kick out of the daily activity of opening a new window or removing a candy. I wanted to pass on the tradition to our son.
To keep things simple, I decided to use an old classroom calendar to help K see the progression of days till Christmas. The teacher in me can't pass up the opportunity to teach him about the days of the week, the concept of months, and counting! Each morning we're adding the date to the calendar and then counting how many days left until Christmas. Nothing fancy, but I love that he's learning and there's no candy involved! Also, this will help him understand the passage of time when we are away in China.
| This year's advent calendar. Nothing fancy, but K thinks it's fun. |
I don't know the owner of this blog, and just stumbled upon it by chance, but I love her ideas. Hopefully she won't mind that I'm giving you a sneak peek of her project picture here. The fun thing about the muffin tins is that you can put whatever you want behind the magnetic circles: a treat, a message, a poem, a promise of a fun Christmas activity to do that day, or part of an on-going story. If you try it, leave me a message or a link to your blog so we can see how it turned out.
![]() |
| Sneak peek of the mini muffin tin advent calendar. Photo borrowed from Sumo's Sweet Stuff blogspot.com |
See you tomorrow for day 2 of my 12 blogs about Christmas.
Friday, November 5, 2010
A Sweet Thank You
| My husband made some awesome cookies last night! I'll share the recipe soon. |
| I wanted to give some of the cookies to our neighbors as a thank you for taking family photos for us yesterday. |
Supplies for thank you gift bag: paper lunch bag, clear bag for cookies, cranberry card stock (3" x 11"), decorative card stock (2 1/2" x 11"), ribbon, adhesive (I love Staples' permanent glue tape), thank you stamp, stamp pads, and 3-D foam tape. I stamped the sentiment, cut it out with a Creative Memories' oval template, and sponged the edges of the oval with brown ink by Color Box.
| The finished product before I tucked it into the gift bag: cookies and a gift card for coffee. I also included the recipe for the cookies in case anyone has food allergies. |
The idea for this gift bag came from a Martha Stewart magazine. It was simple to make, and nice to use items I already had at home. When my husband arrived home with the gift card, I was delighted that it matched my color scheme. He sarcastically claimed that he did that on purpose. Men just don't get it, do they?
Tuesday, October 12, 2010
Introduction to Rubber Stamping
Hi fellow moms. I thought I'd share a demo of a card I made this past week. I try to do something crafty every Sunday, although that doesn't always work out. But this week, I had some fun with a new little stamp set I picked up at the craft store. I love spending time in my craftroom. It's a surefire stress reliever for me, plus I end up with something creative that I can give away.
| I found this cute stamp set for $1.00 (regular price) at Jo-Ann Fabrics. |
| Don't let the $1 stamp set fool you, stamping is not a cheap hobby! Here are some of the supplies I used for this project. I also used a paper cutter, glue stick, ribbon, and scissors. |
| First: adhere your clear stamp to an acrylic block & stamp the puppy. Then stamp your sentiment with a different color. Clear stamps make it easy to get the words in the right spot every time. |
| Now stamp your background paper for extra visual interest. All the card stock I used is from Stampin' Up. Love their products! |
Friday, September 10, 2010
How to Make Kool-Aid Playdough
We've been indoors for days. Summer has been cruelly ripped away since the start of the month, and replaced by gloom and rain. Today it was time to do something different and unexpected to ward off cabin fever. So we made playdough. It's easy, fun, quick and inexpensive.
| Here are the ingredients you'll need. Super easy! |
Kool-Aid Playdough
1 c. flour
1/2 c. salt
3 tbsp. oil
1 sm. pkg. Kool-Aid (any color)
Combine flour, salt, oil and Kool-Aid. (It will be lumpy) Add 1 cup boiling water. Stir together. Knead mixture (careful, it’s hot!) until it forms a soft dough. This play dough will keep indefinitely if kept sealed when not in use.
| K helping to mix the dry ingredients together. |
K picked lemonade Kool-Aid for our playdough. It didn't give the dough enough color, so I added three or four drops of yellow food coloring before I kneaded the dough. I've made this recipe before with grape Kool-Aid and it turned out just fine, and smelled so yummy. The dough is completely edible, but doesn't taste good.
| The finished product was an instant success! |
We had so much fun with this activity. An hour flew by as we cut out shapes, made worms, formed letters, and spelled his favorite words all with our new playdough. After nap, he begged to get the playdough back out.
| Mommy & K having a blast. I love moments like these. |
Friday, September 3, 2010
Easy Thank You Card
School is back in session and for some reason that makes me feel like making crafts. So, I decided to post an easy project idea today. K helped me make thank you cards before Christmas last year. It was fun to send a handmade thanks to family from K. He loved being involved in a craft project and getting his hand painted. I sponged white acrylic craft paint onto his hand and had wet wipes nearby so we didn't make a huge mess afterwards. (Note: I did not let go of his wrist the entire time or else we would have had paint everywhere!) The sentiment is stamped with StazOn jet black ink. The stamp set is called Doodle Alphabet from Stampin Up!, and the cardstock is also from Stampin Up!.
Subscribe to:
Posts (Atom)